- Home
- Articles
- Books
- At the Humming of the Wheel
- Beginning Spin
- Colors: To Dye For
- DYEING IS NOT ALCHEMY! A Beginner's Guide to Theory and Methods of Natural Dyeing
- Handspindles: Not Just for Demonstration Anymore
- Mix It Up: Blending 101
- Parenthood: Vester Field Guides
- Spinning Bast
- Spinning Cotton
- Textile History - A Time Line
- The Ply's the Thing
- Variations on a Draw
- Patterns
- Workshops
- Dyeing >>
- Spinning >>
- Beyond the Twist
- Bast Fiber Without Stress
- Beginning Spinning
- De-mystifying Woolen and Worsted
- Fiber Preparations
- Mix It Up - Blending 101
- Not Just Plan Wool
- Spinning on a Handspindle
- Spinning with a Southern Accent
- Take a Cotton to Spinning Cotton
- The New Fibers
- The Ply's the Thing
- Variations On A Draw
- Variations on a Draw: Beyond Wool
- Crochet & Knit >>
- Beginning Crochet
- Crochet a Garden
- Crochet a Garment with your Handspun, No Matter What
- Crochet a Mobius Crunch
- Crocheted Pansies
- Crocheting a Baby (or not) Afghan with Your Handspun
- Introduction to Filet Crochet
- Mixing Knit and Crochet
- Not Your Grandmother's Granny Squares
- Scrumbling and Doodling in Crochet
- Slip Stitches: Using Slip Stitches In Your Knitting
- Tunisian Crochet
- Lectures >>
- Misc. >>
- Paula's Bio
- Favorite Links
- Downloads
- Calendar
- Gallery
- Contact Us
- About Us
- Privacy Policy
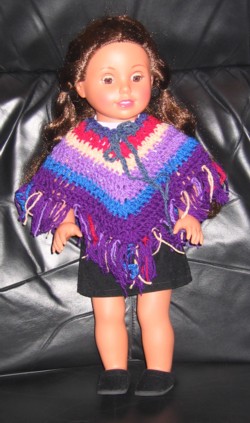
Doll Poncho
Paula J. Vester
Materials:
Scraps of your yarn in any size.
An H hook.
Gauge:
None
Instructions:
Photographed ponchos were made with handspun - @13 wpi = DK weight
Ch 48; join with slst and ch 1.
Mark 1 st ch and 24 th ch.
Pattern:
Rnd 1: Sc at join, ch 1. *skip 1 ch, sc, ch 1* repeat *-* around to end. Join to 1 st sc. Do not turn.
Rnd 2: Ch 4 (is 1dc, ch 1), 2 dc in same space; dc in each sc and ch 1 space to marker. (2dc, ch 1, 2dc) in marked stitch; continue around and dc in each sc and ch 1 to end. Dc in beginning space next to ch4. Join in 3 rd ch of 4ch beginning. Replace markers into ch 1 space of cluster each row.
Rnd 3: Slst into ch 1 space. Ch 4 (is 1dc, ch 1), 2 dc in same space; dc in top of ea dc to marker. (2dc, ch 1, 2dc) in ch 1 space. Dc in top of ea dc back to beginning. Dc in beginning space next to ch 4. Join in 3 rd ch of the ch 4 beginning. Markers should be placed in ch 1 space of cluster corners at each row.
Repeat round three 5 times. Change color yarn at beginning of each row if you want. Join side is center of back.
Finishing - tie fringe at each stitch (I used 2 strands) or do a shell stitch or sc with picot as edging.
Crochet chain and lace through sc row for tie.
Additional Comments:
Make different sizes by measuring doll’s head plus ¼ inch to ½ inch and use even number of chain stitches. You can also use this pattern for real people by measuring their head and adding ½ - 1 inch to your chain and keeping it an even number of chains. Then you mark the half-way chain for the center front. You can work as many rows as you need to reach between the elbow and the wrist.