- Home
- Articles
- Books
- At the Humming of the Wheel
- Beginning Spin
- Colors: To Dye For
- DYEING IS NOT ALCHEMY! A Beginner's Guide to Theory and Methods of Natural Dyeing
- Handspindles: Not Just for Demonstration Anymore
- Mix It Up: Blending 101
- Parenthood: Vester Field Guides
- Spinning Bast
- Spinning Cotton
- Textile History - A Time Line
- The Ply's the Thing
- Variations on a Draw
- Patterns
- Workshops
- Dyeing >>
- Spinning >>
- Beyond the Twist
- Bast Fiber Without Stress
- Beginning Spinning
- De-mystifying Woolen and Worsted
- Fiber Preparations
- Mix It Up - Blending 101
- Not Just Plan Wool
- Spinning on a Handspindle
- Spinning with a Southern Accent
- Take a Cotton to Spinning Cotton
- The New Fibers
- The Ply's the Thing
- Variations On A Draw
- Variations on a Draw: Beyond Wool
- Crochet & Knit >>
- Beginning Crochet
- Crochet a Garden
- Crochet a Garment with your Handspun, No Matter What
- Crochet a Mobius Crunch
- Crocheted Pansies
- Crocheting a Baby (or not) Afghan with Your Handspun
- Introduction to Filet Crochet
- Mixing Knit and Crochet
- Not Your Grandmother's Granny Squares
- Scrumbling and Doodling in Crochet
- Slip Stitches: Using Slip Stitches In Your Knitting
- Tunisian Crochet
- Lectures >>
- Misc. >>
- Paula's Bio
- Favorite Links
- Downloads
- Calendar
- Gallery
- Contact Us
- About Us
- Privacy Policy
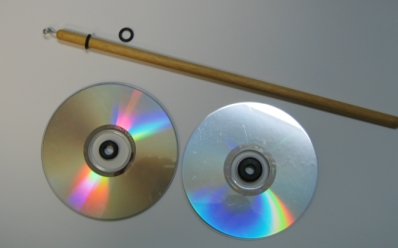
Making a CD Drop Spindle
There are lots of websites which tell you how to make a cd dropspindle and there are even videos that show you how to spin on spindles. Try them, they are lots of fun!
MATERIALS:
2 old/discarded cds (I have also done this with only 1 cd, and it still works, although it spins longer with 2)
1 3/8" diameter dowel (12" long)
1 eyehook- opened to make a hook or small cup hook
wood glue
1 rubber grommet with an inside diameter of 3/8" and an outer diameter of 5/8" - from the electrical department in the hardware store
optional - 2 - 3/8" O-rings
TOOLS:
ice pick or drill and drill bit slightly smaller than the eyehook/cup hook
Needle-nose pliers
Pencil
Sandpaper
Sand the ends of the dowel so they're smooth. On one end of the dowel, mark the center with a pencil. Make a starter hole in the dowel with an ice pick or drill a small hole. You can put a drop of wood glue into the hole before you screw the hook into it. Open the eyehook with the needle-nose pliers so that it creates a hook and then screw it into the dowel. Put the two cd’s together and place the grommet in the hole. Put the recordable sides to the outside make a prettier whorl.
Slide dowel into cd/whorl. You can put the optional O-rings on either side of the cd to help keep it in place, but sometimes the grommet is tight enough. I like the whorl near the top where the hook is, so you can put it just about 2-3 inches from the top.
TO SPIN ON THE SPINDLE:
You will want a little bit of unspun fiber - wool, cotton, even those cosmetic puffs or cotton balls will do to get you started!
Simply catch a bit of the fiber in the metal hook and twist in a clockwise direction to begin the spinning. You are ready to start spinning. Use the pictures to help as you read the written instructions.
Decide whether you want to hold the unspun fiber in your right or left hand, and spin the spindle with the opposite hand. See which is more comfortable for you. Hold the end of the thread (and the unspun fiber should drape over the top of your hand and be held away from the spinning thread so it will not tangle.) Suspend the drop spindle putting tension on the thread. You will be able to spin a fairly fine thread with practice, but it must be strong enough to support the weight of the spindle. Reach with your free hand and hold the bottom of the spindle, give it a clockwise turn to start it spinning.
For beginners: After you give the spindle a good strong spin, and it has spun for several seconds, stop it and place it between your knees to keep it from going in the opposite direction. Still holding tension on the thread use both hands to pull out the unspun fibers and watch the twist move up to form thread. In the drafting, always pull your top hand up to maintain tension on the newly spun thread. When the twisting stops moving up the thread, pinch it off and give the spindle another good twist. You may have to unhook the thread and wind some of the thread on the shaft of the spindle as explained below.
When you are more experienced: When you can spin a fairly uniform thread using the method above, feel free to try the traditional drop spinning with the spindle suspended while turning. Give the spindle a good firm turn and use both hands to draft out the fibers so that the twist moves up the fibers forming thread.
Continue to spin until you have a small amount of the roving left in your hand. The actual amount will be determined by the length of the fibers and the thickness of the thread you are spinning. When you are ready to join on another piece of roving, allow the unspun fibers from the thread to lay on top of the new roving and draw out the two sections together for a smooth join.
Once the drop spindle either reaches the floor, if you are holding it between your knees and have gone as far as your arms can reach, or you cannot keep it spinning, hold the thread under tension and take the spindle in your free hand. Unhook the thread from the notch or hook, and wind, clockwise, onto the shaft of the spindle evenly from the end closest to the whorl out. You will form a cone shape in your windings. You then hook the thread back on the notch or hook, leaving several inches of thread above the notch, and continue spinning.
We have attached a PDF file of the above information with more photos included.
attach: